


January 20th, 2024 Issue
Intensive Planting / Oriental Herbal Nutrient- OHN / Foraging Cattails / Float Fishing Lesson #16 Prime Temperature Ranges / Fly Tying Lesson #16 Mosquito


Intensive Planting
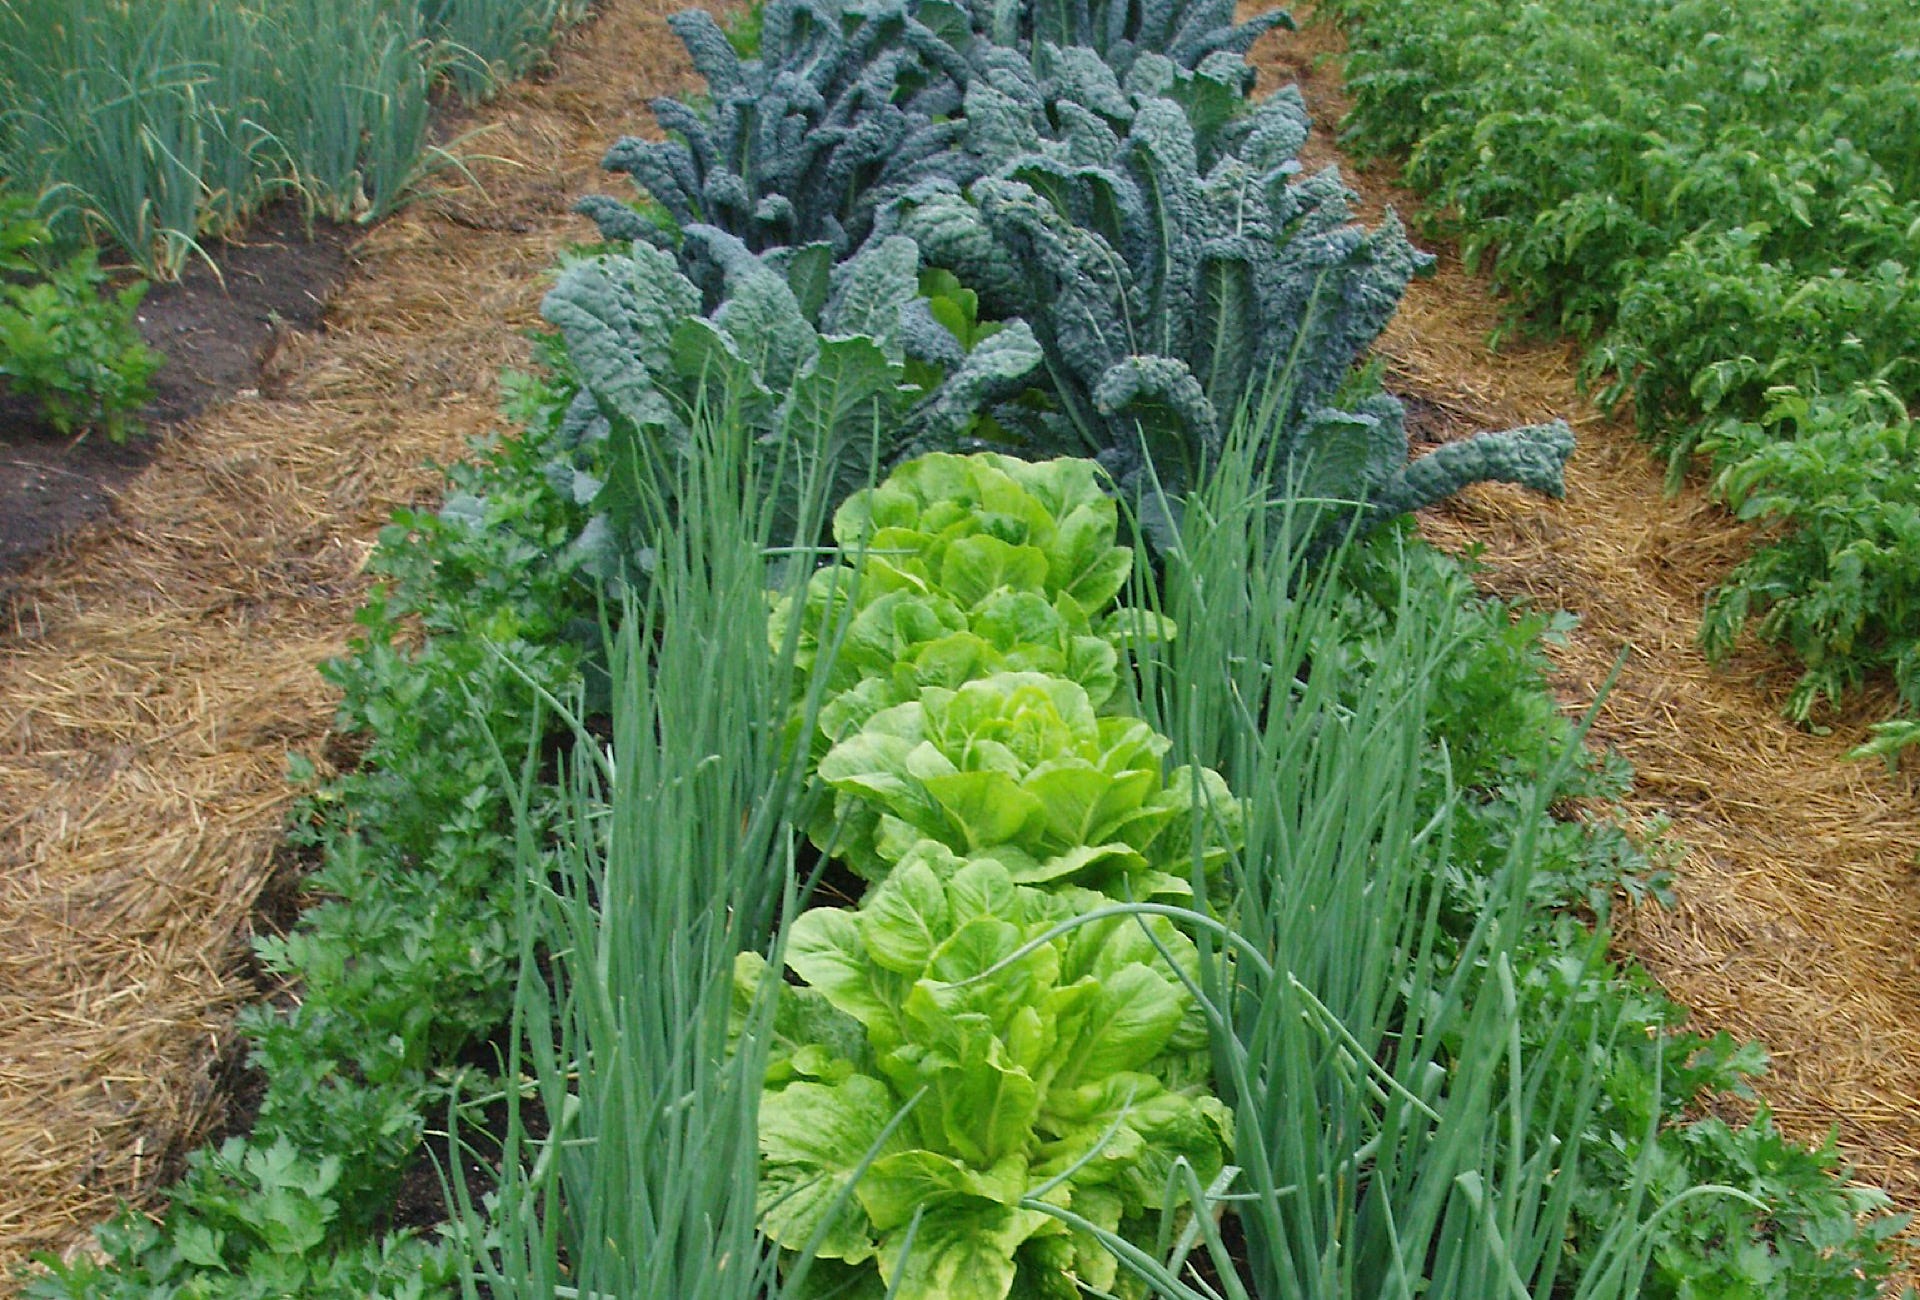
I want to spend some time now looking at why I have chosen to adopt more of a French intensive style of planting. Some would also refer to this as Biointensive. The focus is creating wide garden beds, that have been deeply dug. Once you have created the beds, you now focus on nurturing the soil life and fertility. If it is done right, it allows you to plant your seedlings much closer together, then would be possible with a conventional garden. Most gardens, where the soil has been loosened just shallowly, will only permit you to plant your seedlings at much wider spacing. Typically with a walking path between each row of plants. Having walking paths so close to every row, further compacts the soil more quickly around the roots of the plants. The roots need loose soil, so that the biology has good air exchange to thrive. The more compact your soil, the less the roots and biology will be able to excel. The condition of the above ground plant, is a direct reflection of how much this life under the soil is thriving. This is why I will continue to encourage you to stay focused on creating the ultimate environment for the biology in the soil. If you have it, then everything else naturally falls into place.
I can take most peoples gardens and make them 1/6th to 1/12th the size they are now, getting better yields of mineral dense crops. This extreme reduction in size has many benefits. Principally much less area to weed and water. It only works though if you know how to feed the soil properly. I had friends one time say they tried to grow intensively but it didn’t work for them. The only thing they did was just try planting their plants closer together, on soil that was not fertile enough, just shallowly dug. This will never work. If you bring your plants closer together, without increasing fertility and air exchange in the soil profile, you are only going to increase the stress level upon your plants. Probably resulting in much lower yields, and pest and disease problems. Once you learn how to make your soil’s engine purr. You will be amazed at how much your plants will thrive, with very little pest and disease issues.
Plant spacing though is a whole other arena that you will need to learn to master. This has a lot of variables to consider. Are you just going for the greatest possible yield? You will get the greatest yield of grain corn, spacing your plants somewhere around 7”x7”, if your engine is purring. The ears of corn are going to be much smaller than typical, but overall yield much better. But we also need to realize, there is a sweet spot that we need to find within each crop. My overall yield could be greater, but is the quality the same? Did I stress the plants a bit much to squeeze that extra yield, yet the mineral density of the crop was reduced. I have learned over the years the optimal spacing for certain crops, not only based on overall yield, but quality as well. I am not interested in created food in greater quantity, that has reduced the quality. I have learned to have the quality, and yields that are typically much higher per square foot that the typical row garden.
One of the biggest factors in you finding that sweet spot, for each crop, is in variety selection. Not all varieties of a given crop will respond in the same way. Take cabbage for instance. I like to grow Red Express. If you have seen my seed saving video series on saving cabbage seed in a northern climate, that is the variety that I have been maintaining. Those plants are just naturally smaller, it doesn’t matter how much space and fertility you give them. Some cabbages are very different though in that regard. Late Flat Dutch or Copenhagen Market will get huge, if you increase their space. So you have to decide what you are looking for. I prefer a much smaller, red cabbage head in my root cellar, that will be easier to utilize more quickly for fresh eating. If my focus was making a large batch of fermented cabbage, then the larger heads would be my preference. You may be growing for a chef, that wants a specific variety of vegetable. You will need to determine that particular varieties sweet spot. Becoming a truly exceptional grower is very much tied to your ability to quickly discern these kinds of nuances.
Once you determine the varieties sweet spot, and bring the plants the right spacing apart. You now have the soil surface covered in a living mulch. Because you have maximized the vegetative solar panel to catch as much of the sun’s energy as possible, the soil surface is much more shaded. Greatly reducing the amount of weeds you will have to contend with, and the amount of watering you will have to do.
The Regenerative Homestead Newsletter’s Main Index
This link will take you to a full Index, of all the articles that I have published, organized by topic. Making it very easy for you to go back, and revisit an article that you wanted to review again in the future.


I published this article in a separate newsletter last Tuesday. This link will take you to that newsletter.

If you know someone, that you think would enjoy this newsletter, please let them know by sharing it. Thank you!

Oriental Herbal Nutrient- OHN
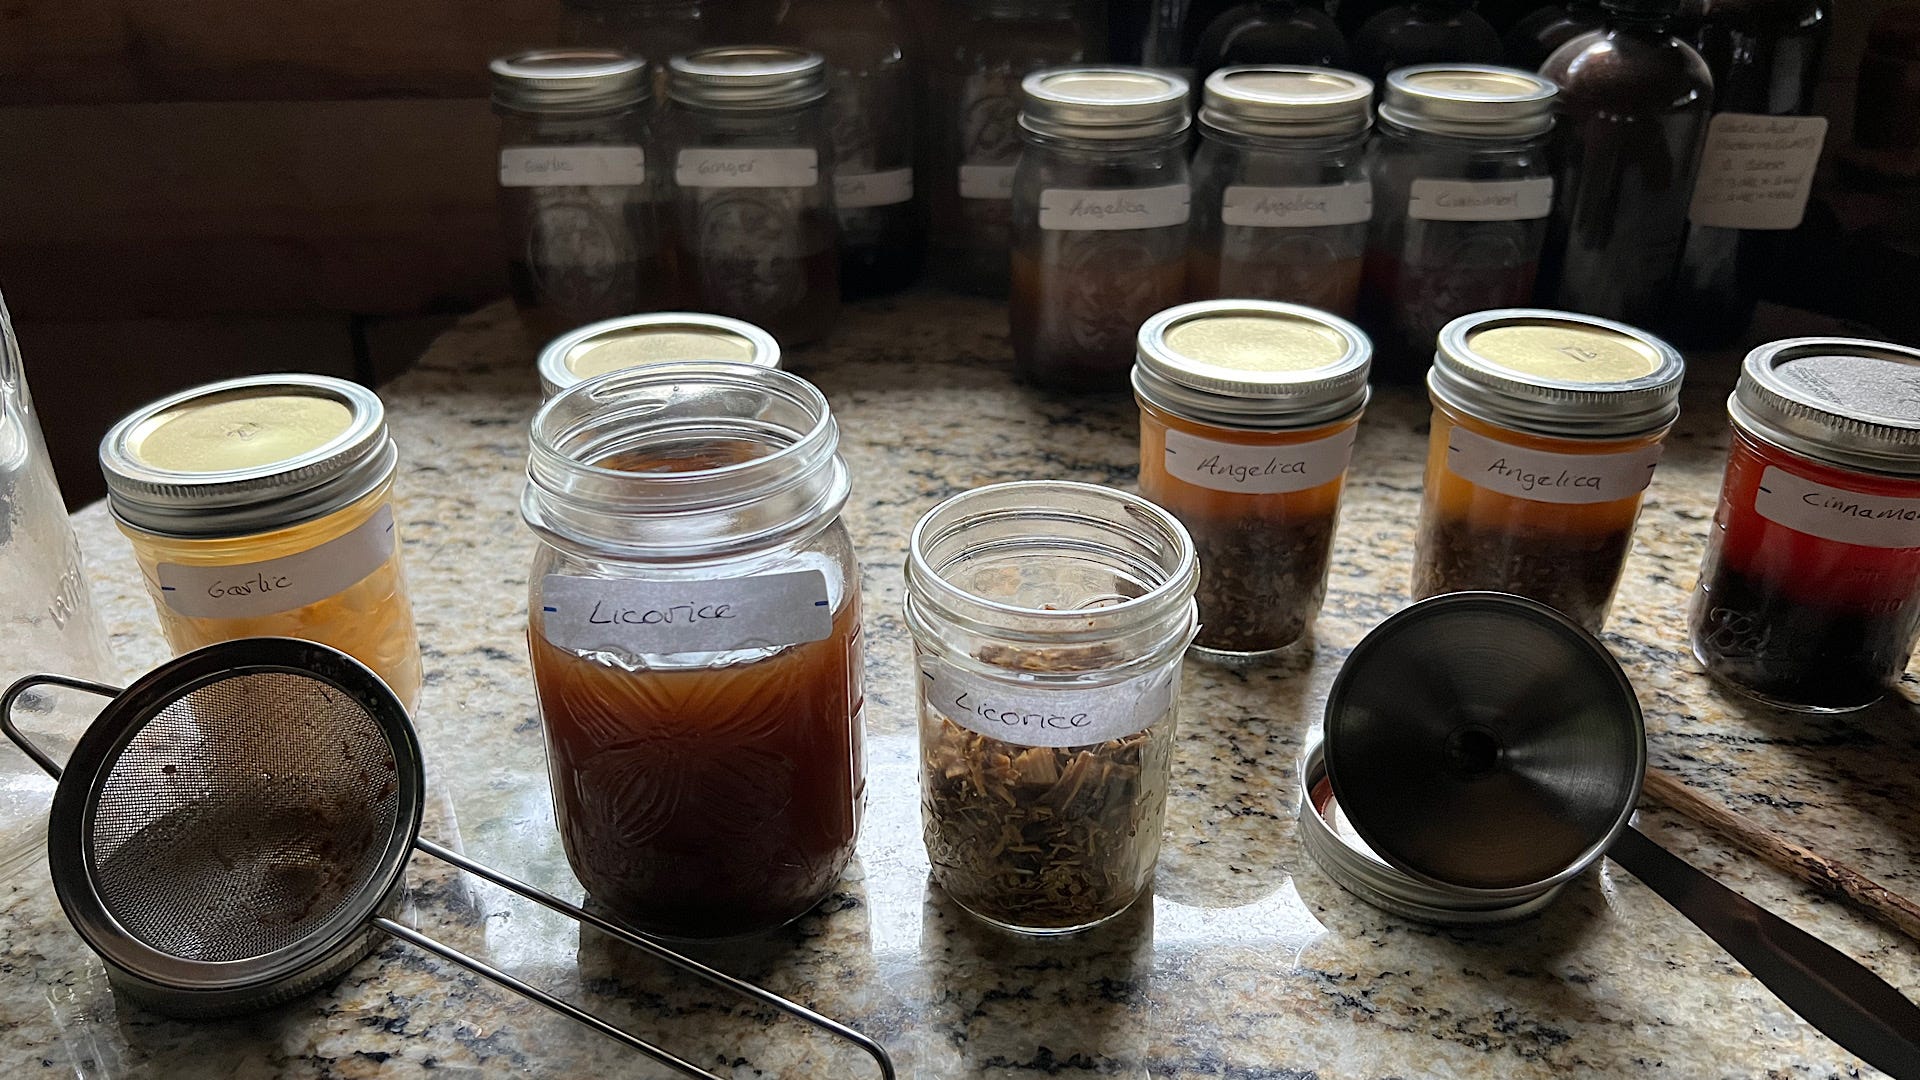
We discussed in an earlier newsletter, how the Koreans had learned to use their knowledge base to solve problems in their gardens. In the eastern cultures, making tinctures with alcohol, from plant materials to enhance the availability of certain constituents has long been part of their personal health care. As they sought to meet the needs of their crops, they also began to experiment with tinctures being foliar fed to plant to see how they would respond. That is what Oriental Herbal Nutrient, or OHN is. A combination of herbal extractions in alcohol that benefit the plants greatly, if used properly. Just like with the FPJ we just discussed. It will be important that you follow the directions of how to make it properly, and how to apply it to your plants. This tincturing process will be one of the most difficult things for you to achieve in all you are doing in KNF. I don’t say that to deter anyone. Anyone can learn to make it. It is just detailed and takes time. The wonderful thing is that it last a long time, and only gets better with age. In fact you can use half as much in your foliar sprays after it has aged for three years, because it continues to micronize and further break down as it ages. Because so little is needed in each spray, this is something that many KNF practitioners will choose to purchase starting off. When I took my class, I purchased a small bottle of OHN and the Fish Amino Acids from someone that had been practicing for awhile. This allowed me to get started right away, and bought me some time to make my own. When I made my first batch of OHN, I made a large batch so I would have enough it would last me a long time, and to have extra available to my students that were just starting out.
I did a full video series, explaining in detail all the import steps that you need to take. My instructor, Chris Trump, also has videos on YouTube that show how to make it in larger batches. His recipe will give you six gallons when you are finished. When I made my video series I did it on a much reduced scale, with the home gardener in mind. If you do decide to make this, then watch the complete series before you even begin. There are things said, even in the final video that will aid you as you begin. The dried herbs used in making the tinctures, can be purchased on line. Get organic if you can. You would definitely not want any pesticide or herbicide residues mixed in with this. It would totally destroy the benefit of what you are attempting to achieve. If there are any of you that want to try this, but don’t want to take on making your own batch. I have OHN that is over three years old, that I can sell you in a small quantity to get you started.
This link will take you to a list of the six videos in the series I made. They are not in order. You will need to read the titles to see which one is part one. I found this list just by doing a search on my Rumble channel.
https://rumble.com/user/Schaafcraig?q=Oriental%20Herbal%20Nutrient

Foraging Cattails
Of the wild edibles that most people have available to them, the lowly cattail, is probably one of the most giving plants. This plant can be utilized throughout the year. The roots can even be dug in the winter, if someone was desperate for their nutrition.
First thing in the spring, as the new shoots emerge, and the plants get about three foot tall. You can pull the plants center core, and reveal a white shaft that tastes very similar to cucumbers. I really enjoy gathering a few of these, and cutting them up into my salads.
As the plants further develop, it will send up a seed stalk, with a developing flower head. You can utilize these heads a couple of different ways. If you catch them just before they start to pollinate, then you can steam them and eat them like sweet corn. In fact they even have a husk that you need to remove before you cook them.
If you wait till they are releasing their pollen, then you can shake the pollen into a brown paper bag, going throughout the marsh collecting this rich pollen. It can be used as flour for making bread and pancakes. I have used it before, and it makes very nutritious yellow pancakes. I mixed it with a diversity of other flours. It has been estimated that you can get more flour per acer of cattails, than you can of wheat. I am not sure that that is true, but it is amazing how quickly you can gather it when the conditions are right. The heads will develop at different timing on each plant. In other words, they are not all pollinating at the same time. This will give you a window of opportunity to go back repeatedly to harvest more. Storing it can be difficult. Many people seem to freeze what they don’t utilize right away. After you gather the pollen, you will need to sift it through a fine screen to remove any impurities you may find. As neat as the pollen is, cultures of the past that utilized the cattail regularly, would emphasize the flower heads just before the pollen is released. These heads are just packed with nutrients, and are very easy to collect and utilize.
The other thing you can harvest from the plants are their roots. This is something I have not personally done. Harvesting in the fall, after the plant has stored its summer energy in its rich starches, is optimal. You can harvest the roots and wash them. After they are clean you can crush them in clean water and the starches will be released. These starches can be utilized as a flour substitute as well.
Take some time this spring and summer to try some of these different resources, that are so readily available. I think you will enjoy them. This is a picture of some of the steamed flower heads.


Float Fishing Lesson #16 Prime Temperature Range
The next lesson I want to give you is something that will aid you, no matter what kind of fishing you are doing. That is an understanding of what water temperature is prime for each species of fish. So what makes a certain temperature, the prime temperature? It all has to do with how temperature effects a fishes metabolism. You see fish are cold blooded creatures. Their metabolism is going to be greatly effected by what temperature of water they find themselves in. The colder the water is, the less they need to eat, because they are burning less calories to survive. For each species of fish, there is a range of temperatures that they are most comfortable, and need to consume the most food. When you can find a location, that a fish is at its prime range and there is plenty of insects or baitfish present as well, you have a recipe for a great fishing experience.
To understand how important temperature is though, you need to understand how temperatures can vary within a fishes habitat. If you are fishing a lake, in the heat of summer, then the warm water is at the surface. The cooler water has sunk, to lower depths. If you are a swimmer, and you have dove off a diving board into a lake. You know the feeling of getting about ten to twelve feet down and getting hit with a cool rush of water all of the sudden. That cool water change, is called the thermocline. This is very important, especially for certain species of fish that prefer cooler water temperatures. When I am fishing for large panfish in the summer, it is common for me to find them hanging out and cruising at this thermocline depth. Trout would definitely be attracted to these temps as well. Bass have a warmer prime range, and you will find them cruising at nighttime, the shallows of the lake where it is much warmer, just loving it.
Another area that will offer the fish cooler water temperatures, are springs. These are areas on the bottom of the lake or stream, where the cooler ground water is injected into the system. These can be very important, especially in the heat of the summer or the depths of winter. Because they are bringing stability to the waters temperatures.
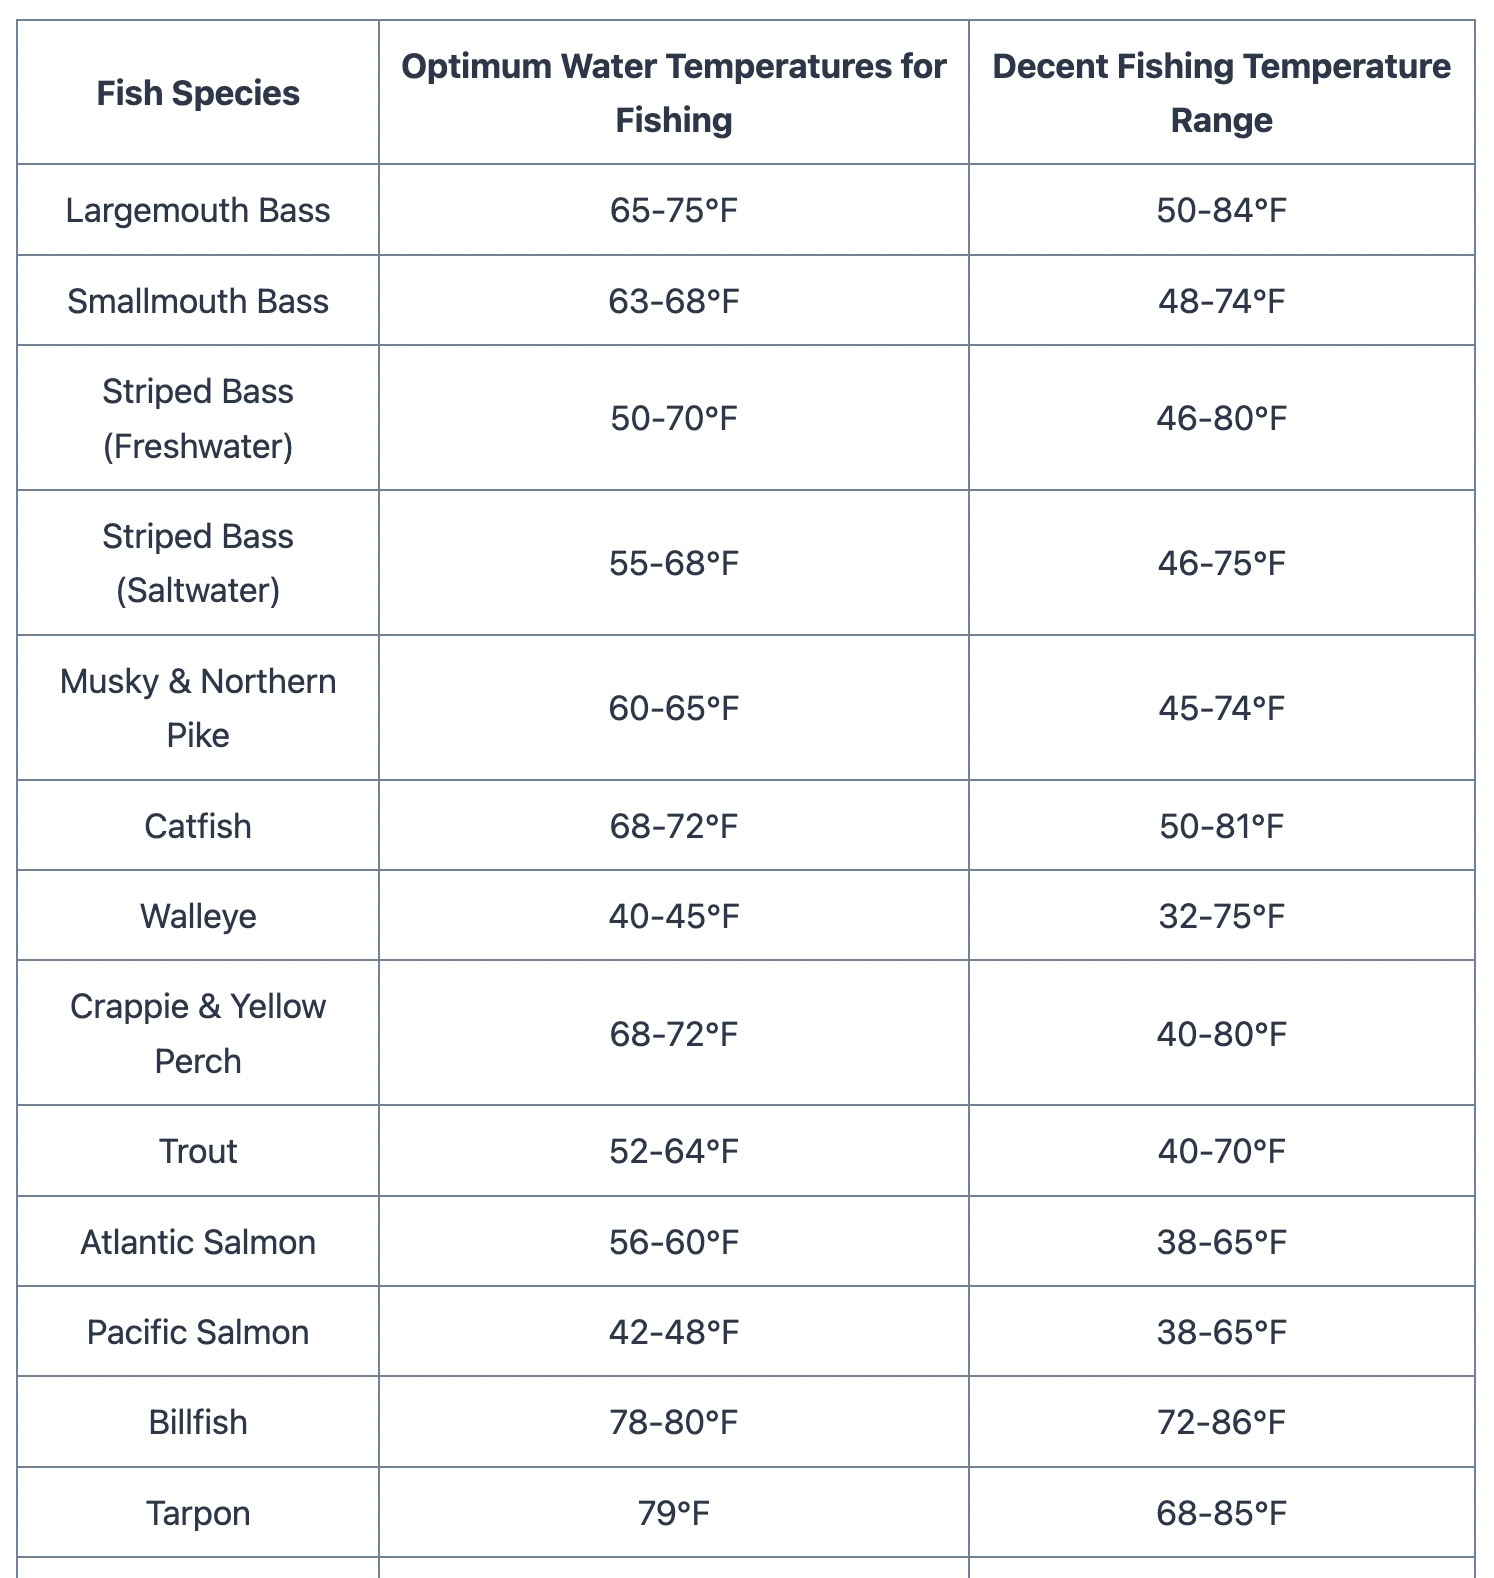
Another concept you will need to understand, especially in the north, is turn over. This is the result of the cooler air temperatures of fall, cooling the surface of a lake. As the surface of the lake becomes cooler than the bottom. The water from the bottom will rise to the surface. This is a period of fishing that can be spectacular for certain species of fish. Especially walleye. All the sudden the whole lake happens to be in their prime temperature range, and they cruise and take full advantage of it. Most fisherman miss out on this time, because often their attention has been drawn to other outdoor activities, like hunting. Here is a screen shot I took of some prime temperature information. If you want to do further study on this, and you should, you will find videos discussing these different concepts.

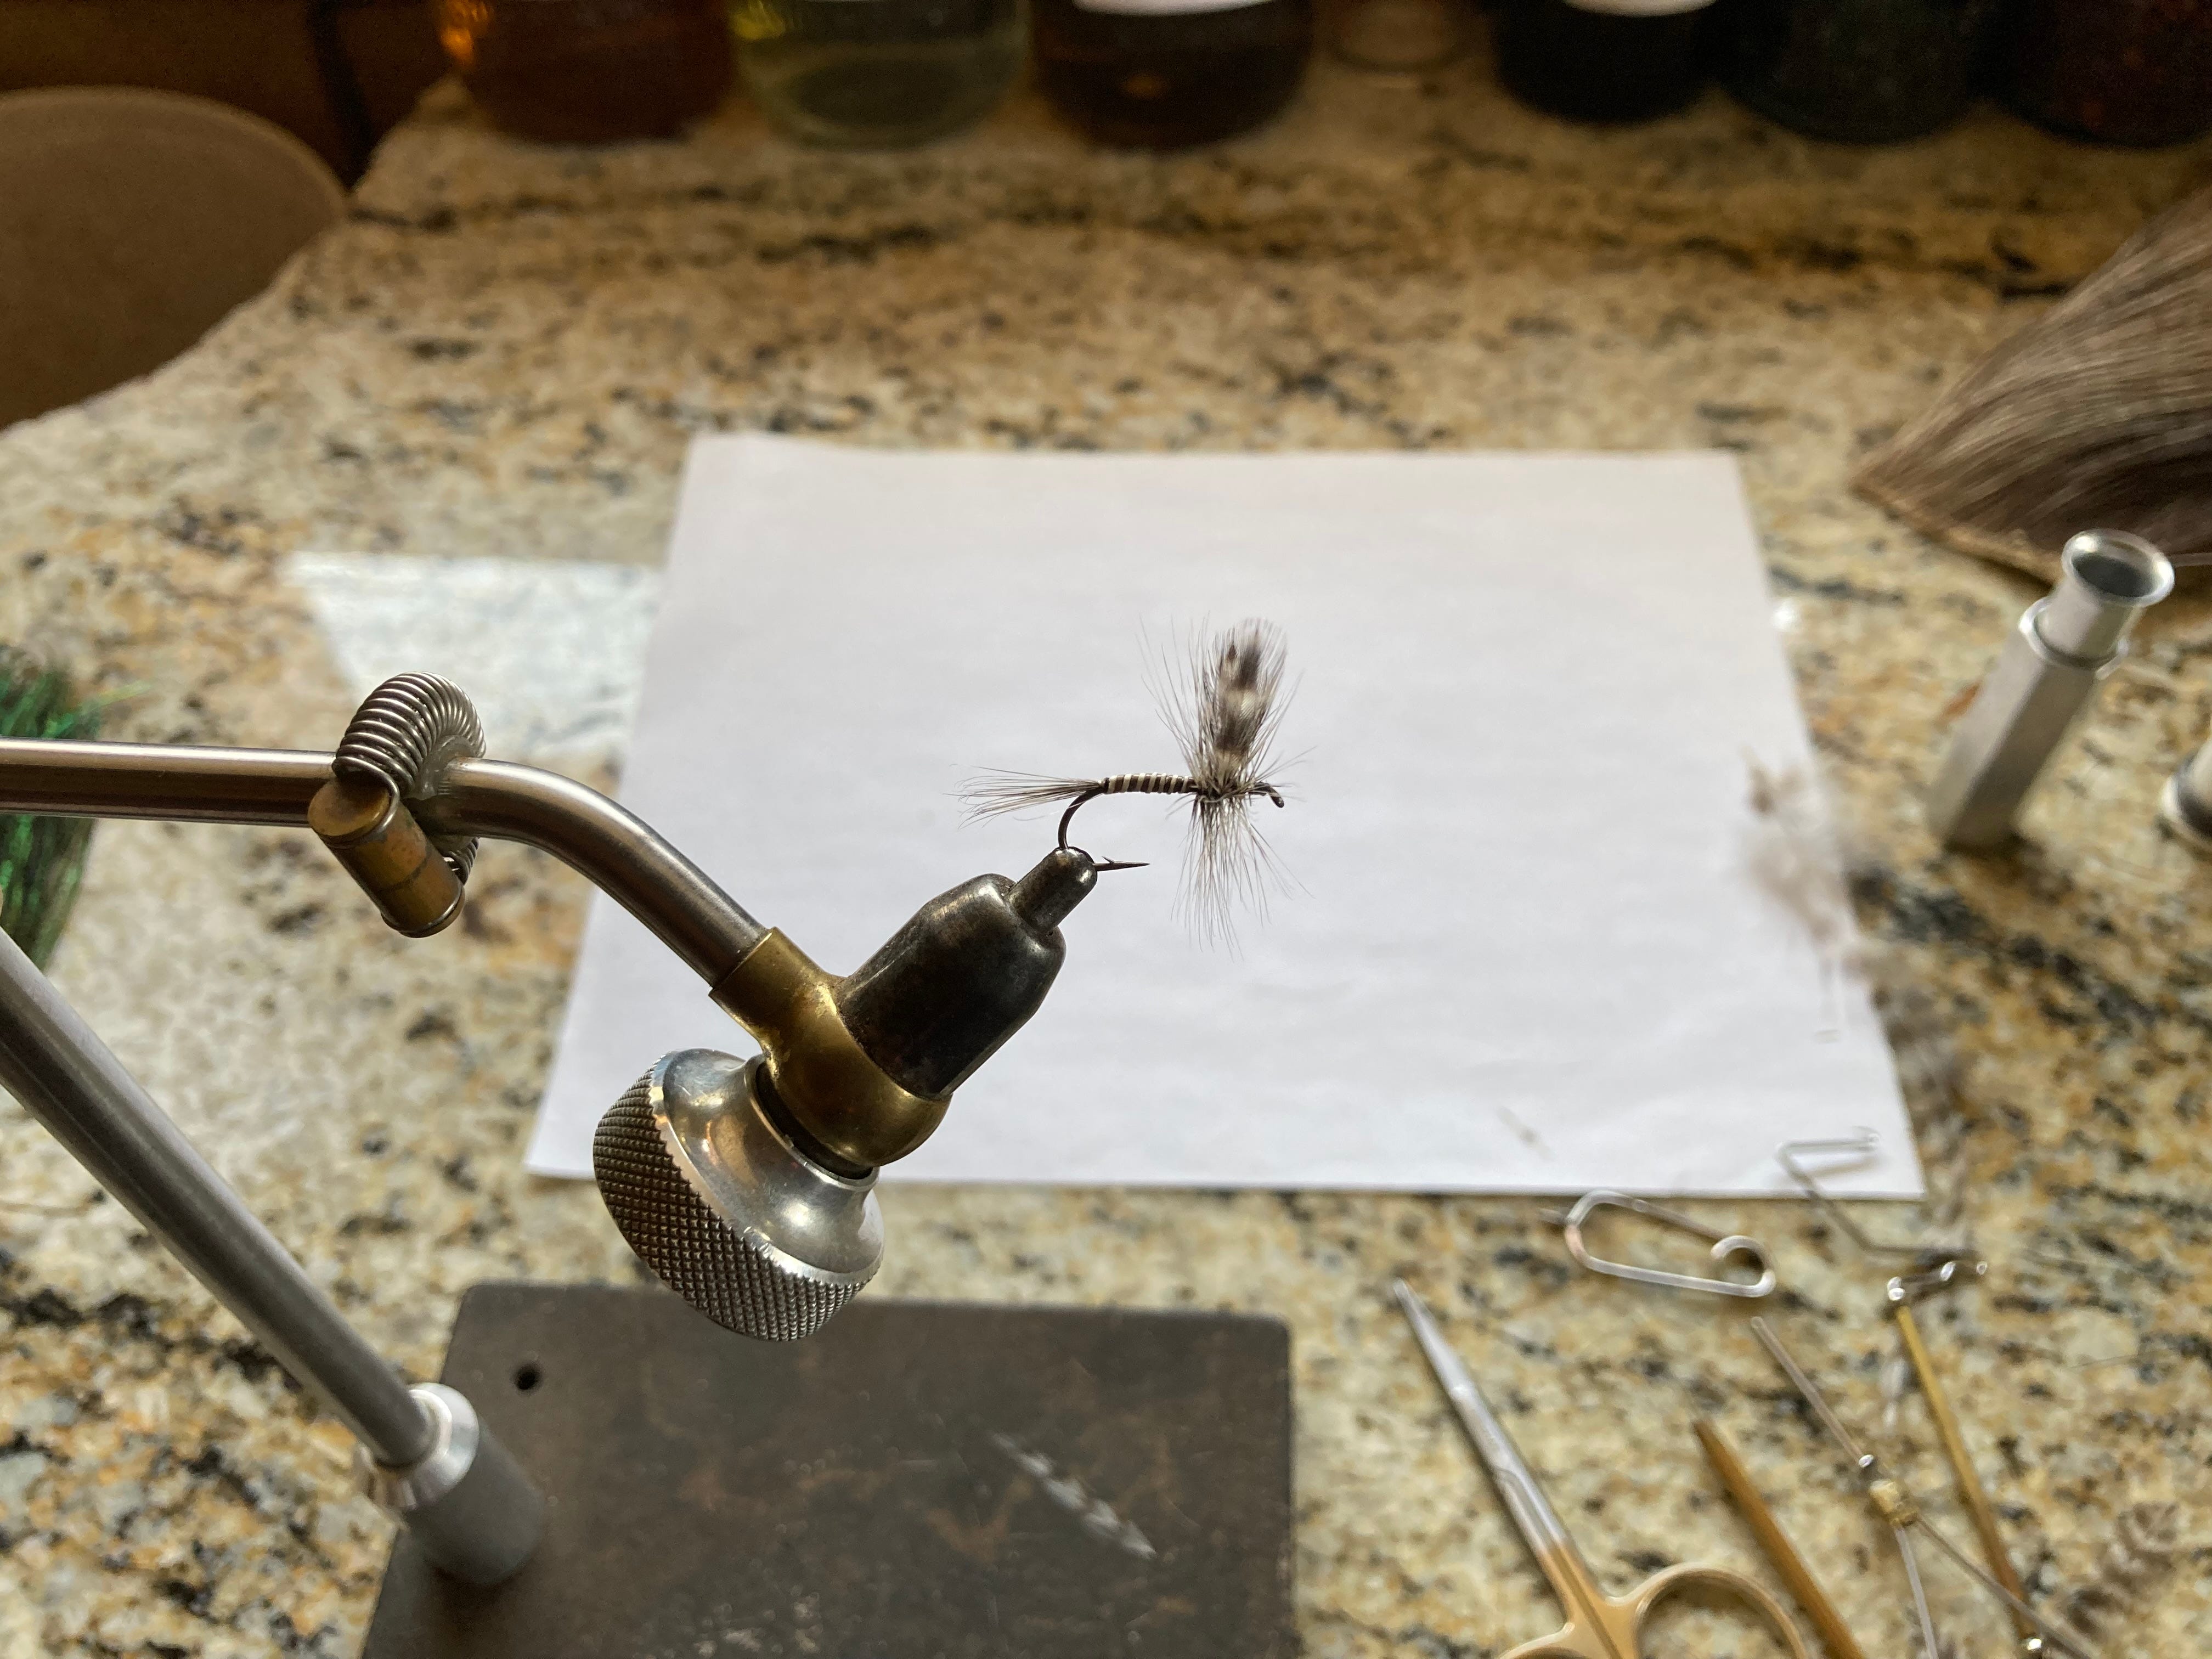
Fly Tying Lesson #16 Mosquito
In this lesson we will tie the mosquito. A really great dry fly pattern, and one that will challenge your fly tying dexterity.
https://rumble.com/vxgrcg-fly-tying-class-lesson-16-mosquito.html

What is “deeply dug”? Is this 18”, 24” 36” or more? A neighbor told me in our area if you dig more than a foot, you will hit rock, so I assume this means I will be building up the soil depth. I’d really like to know a good depth to start out with. Thanks.
Wow! I never knew you could do so much with cattails! I will be on the lookout for these in the spring.